

Here’s a complete list of all Aid Requests from every facility and porter in Death Stranding 2!
We’ve also included some simple tips on how to complete them.
日本語版の攻略記事はこちら
What is Aid Request?
Aid Requests are different from standard orders — they don’t require you to accept or report them formally.
By completing them, you can increase your connection level with the facility, and sometimes receive special messages from SSS.
Note: There are no special rewards or trophies for completing all Aid Requests.
Conditions for Aid Request Availability
Aid Requests generally become available once you unlock each facility.
Some requests may only appear after completing other Aid Requests.
Types of Aid Requests
There are 3 main types of Aid Requests:
- Retrieval
Requests to retrieve lost cargo found on the map and deliver it. - Enemy Elimination
Requests involving combat against enemies such as Bandits or Brigands, or battles against large BTs. - Structure
Requests to construct structures such as ladders or safe houses.
How to “Retrieval Requests”

Items to be retrieved (Retrieval Cargo) are often located in hard-to-reach places.
To make collecting distant cargo easier, it’s recommended to bring equipment like the Climbing Power Gloves and Sticky Cannon.
Also, cargo on the field is frequently found on cliffs or below cliffs, so carry plenty of Ladders and Climbing Anchor.
You can hand off cargo to other players at facilities other than the delivery destination, but this may cause cargo degradation. Whenever possible, deliver the cargo on foot yourself.
Some Retrieval cargo may be found in Enemy Camp or BT Area. In such cases, always bring weapons for protection.
How to “Enemy Elimination Requests”
Enemy Elimination Requests include exterminating Chiral Creatures, battling BTs such as Watchers and large BTs, as well as engaging in combat against human enemies like Bandits.
How to Fight Chiral Creatures
To eliminate Chiral Creatures, take advantage of their tendency to chase the player. When they pursue you, scatter Blood Grenades at your feet to easily dispatch them.
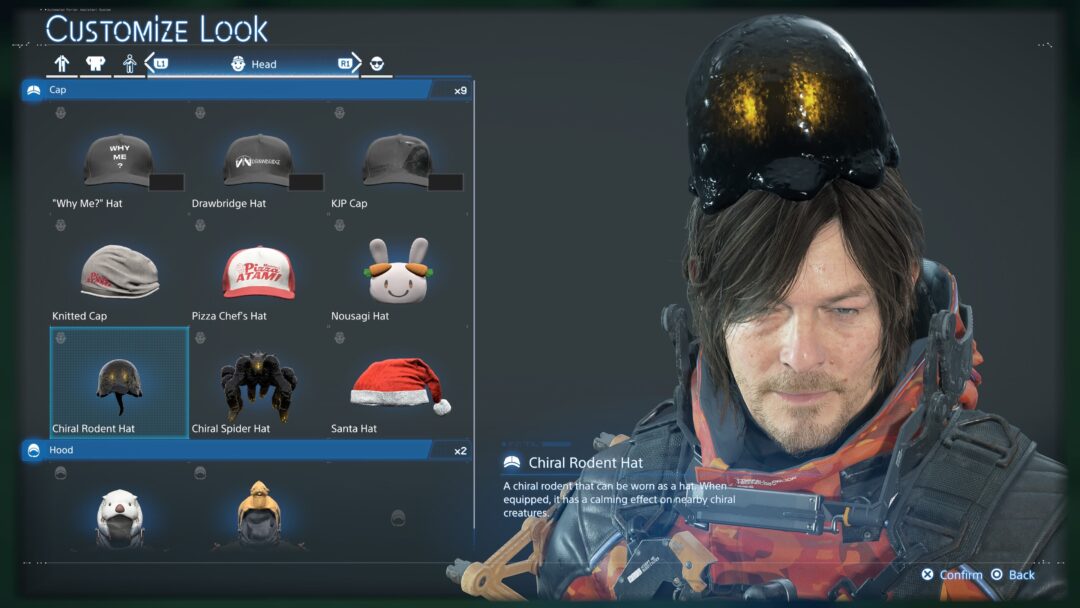
If you prefer to avoid being chased altogether, it’s recommended to equip the cosmetic “Chiral Rodent Hat”, which helps keep them at bay.
The cosmetic item “Chiral Rodent Hat” can be obtained by reaching connection level 2 with The Metagenomicist.
Note that Chiral Creatures may not always appear every time you visit a location. If they don’t show up, try returning on a different day to check again.
How to Fight Watchers and Large BTs
In the early game, you can defeat Watchers by hitting them with several Blood Grenades.
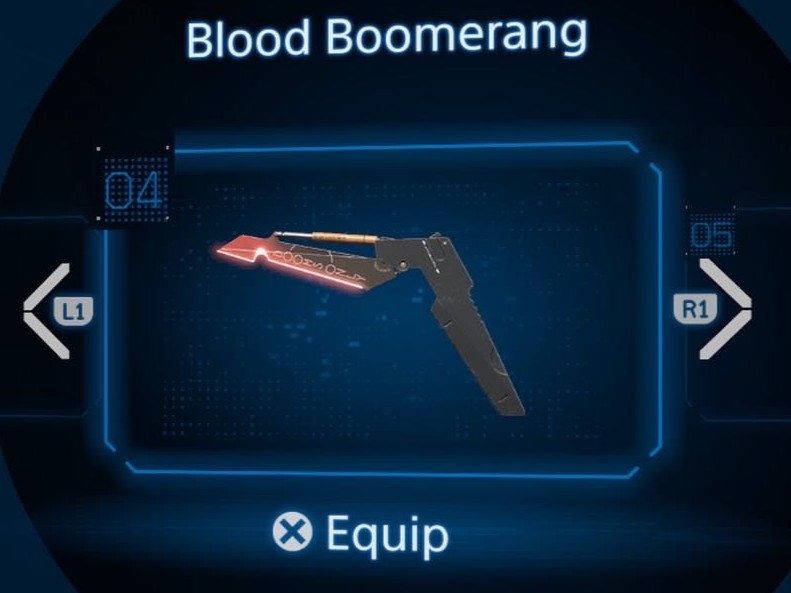
From mid-game onward, you can take them down from a distance using the Blood Boomerang, which you acquire in Chapter 4, so be sure to carry plenty of Blood Bags.
When fighting large BTs, bring powerful weapons like a Machine Gun or Grenade Launcher. If you have the resources, try using Ex Capture Grenades to capture large BTs instead of just defeating them.

How to Fight Against Human Enemies Like Bandits
Before heading into enemy outposts like those controlled by Bandits, use the Watchtower to scout enemy numbers and locate Retrieval cargo.
For combat against human enemies, you can choose between stealth tactics—such as sneaking up from behind to use Strand restraints or silent weapons—or go in guns blazing, using vehicles equipped with machine guns to suppress foes. Pick the strategy that suits your playstyle.
Combat at Bandit outposts often comes paired with Retrieval missions. Be careful not to accidentally damage or destroy the cargo you need to retrieve, as this can lower your mission rating. Watch out for things like grenade blast radius or accidentally running over cargo with vehicles.
How to “Structure Requests”
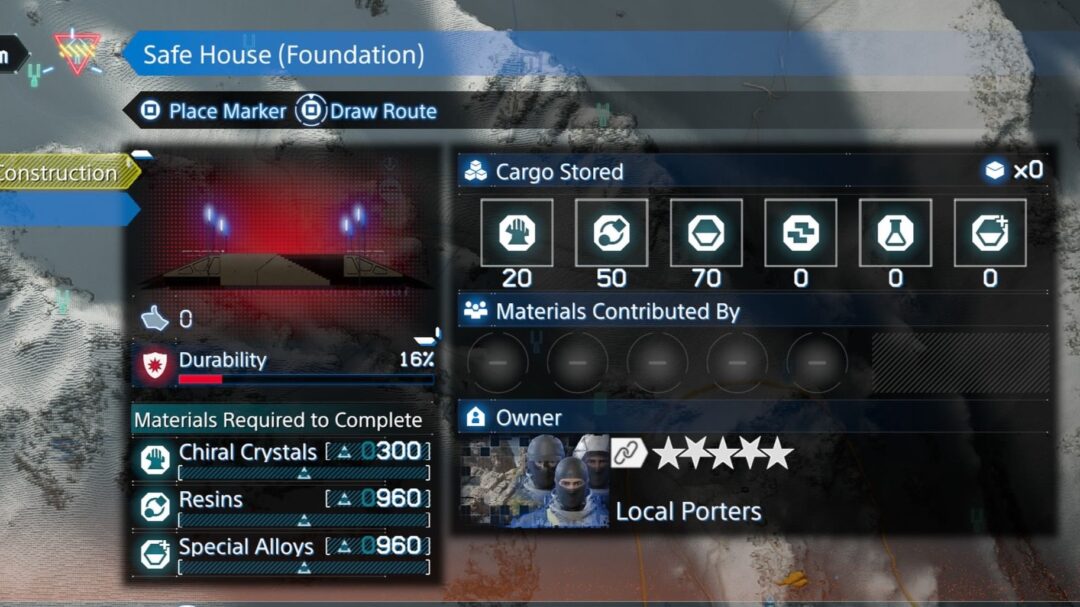
“Structure Requests” require you to place buildings like safe houses or smaller items like ladders.
Make sure to bring the necessary construction devices and ladders to the installation site.
For buildings such as safe houses and bridges, you don’t need to use PCC; just bring the required building materials. You can check the number of materials needed by looking at the foundation of existing structures on the map.
You can delete placed structures immediately without any issues, so if you’re running low on chiral bandwidth, feel free to remove them. Note that the foundations of safe houses and bridges are not placed by the player, so they do not consume chiral bandwidth—just use them as they are.
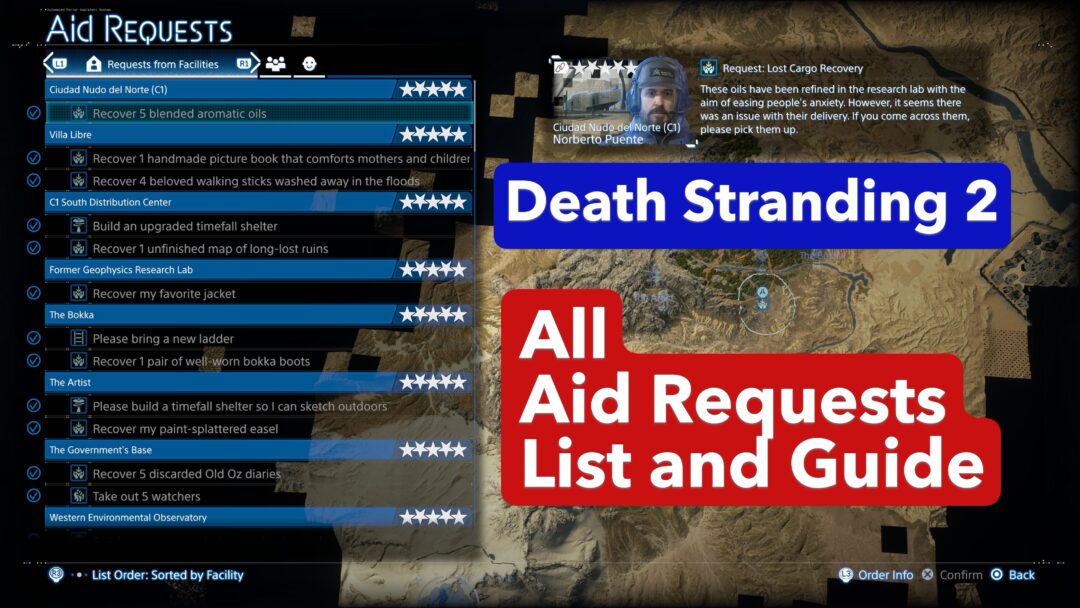
List of Aid Requests
Aid Requests from Facilities in Mexico
| From | No. | Order | Type | To |
|---|---|---|---|---|
| Ciudad Nudo de Norte (C1) | 1 | Recover 5 blended aromatic oils | Retrieval | Enemy Camp Near The Artist |
| Villa Libre | 2 | Recover 1 handmade picture book that comforts mothers and children | Retrieval | Near The Artist |
| 3 | Recover 4 beloved walking sticks washed away in the floods | Retrieval | Enemy Camp Near Villa Libre | |
| C1 South Distribution Center | 4 | Build an upgraded timefall shelter | Structure | BT Area Near Former Geophysics Research Lab |
| 5 | Recover 1 unfinished map of long-lost ruins | Retrieval | Near C1 South Distribution Center | |
| Former Geophysics Research Lab | 6 | Recover my favorite jacket | Retrieval | BT Area Near Former Geophysics Research Lab |
| The Bokka | 7 | Please bring a new ladder | Structure | Near The Bokka |
| 8 | Recover 1 pair of well-worn bokka boots | Retrieval | Enemy Camp Near The Artist | |
| The Artist | 9 | Please build a timefall shelter so I can sketch outdoors | Structure | Near The Artist |
| 10 | Recover my paint-splattered easel | Retrieval | Near The Artist |
Aid Requests from Facilities in Australia
| From | No. | Order | Type | To |
|---|---|---|---|---|
| The Government’s Base | 11 | Recover 5 discarded Old Oz diaries | Retrieval | Near The Western Environmental Observatory |
| 12 | Take out 5 watchers | Enemy Elimination | BT Area Near The Government’s Base | |
| The Western Environmental Observatory | 13 | Build a generator to help us defend ourselves | Structure | Near The Western Environmental Observatory |
| 14 | Please rebuild the roads | Structure | Near The Western Environmental Observatory | |
| 15 | Recover 2 plate gate fragments | Retrieval | Near The Western Environmental Observatory | |
| The Lone Commander | 16 | Set up a climbing anchor-the climber’s best friend | Structure | Near The Government’s Base |
| 17 | Take out 4 Brigands | Enemy Elimination | Enemy Camp Near The Government’s Base | |
| The Musician | 18 | Recover 7 containers of fan letters | Retrieval | BT Area Near The West Fort Knot (F1) |
| 19 | Take out the strange rodent-like creatures | Enemy Elimination | Near The Musician | |
| The West Fort Knot (F1) | 20 | Build a bridge for your fellow porters | Structure | Near The West Fort Knot (F1) |
| 21 | Recover 3 old monorail moteors | Retrieval | Near Mine North of F1 | |
| 22 | Recover 4 tool sets that were dropped from the monorail | Retrieval | Near The West Fort Knot (F1) | |
| The Inventor | 23 | Recover 3 assortments of junk parts | Retrieval | Near Mine North of F1 |
| 24 | Take out 5 floating BTs who’ve been stealing cargo | Enemy Elimination | Near F2 South Distribution Center | |
| The Pioneer | 25 | Recover 1 piece of unusually colored kangaroo fur | Retrieval | Near The Pioneer |
| 26 | Recover 1 unusually lyrebird tail feather | Retrieval | Enemy Camp Near The Motherhood | |
| 27 | Recover the unusually colored echidna quill | Retrieval | Near Heartman’s Lab | |
| Rainbow Valley | 28 | Recover 3 growing lights rescued from the fire | Retrieval | Near Animal Shelter |
| 29 | Recover 5 containers of rainbow candy lost in the river | Retrieval | Near Rainbow Valley | |
| Animal Shelter | 30 | Build a timefall shelter for the local wildlife | Structure | Near Animal Shelter |
| 31 | Recover 1 bottle of nuts | Retrieval | Near Animal Shelter | |
| 32 | Recover 3 remote vital signs monitors | Retrieval | Near The Inventor | |
| The Fisherman | 33 | Recover 3 stolen marine microbe samples | Retrieval | BT Area Near The Fisherman |
| The Northern Environmental Observatory | 34 | Build a watchtower for surveillance purposes | Structure | Near The Northern Environmental Observatory |
| 35 | Recover 5 latest-model handguns | Retrieval | BT Area Near The Northern Environmental Observatory | |
| The Architect | 36 | Build a chiral bridge | Structure | BT Area Near The Architect |
| 37 | Recover 3 architectural models | Retrieval | BT Area Near The Northern Environmental Observatory | |
| 38 | Take out 4 of the bastards who are destroying structures | Enemy Elimination | Enemy Camp Near The Architect | |
| F2 South Distribution Center | 39 | Recover 1 piece of the precious raw material known as tar magnetite | Retrieval | Enemy Camp Near The Architect |
| 40 | Recover 3 tanks of industrial waste that were washed away | Retrieval | Near Mine North of F1 | |
| The Dowser | 41 | Build a zip-line in a safe location | Structure | Near The Dowser |
| 42 | Eliminate 3 enemies that are causing trouble | Enemy Elimination | Enemy Camp Near The Architect | |
| 43 | Recover 1 dowsing rod | Retrieval | Near F2 South Distribution Center | |
| Heartman’s Lab | 44 | I would like to see a hot spring digger build | Structure | Near The Dowser |
| 45 | Recover the chiral microbe antibiotic sent by my daughters | Retrieval | Near The PizzaChief | |
| The Motherhood | 46 | Deploy a ladder | Structure | Near The Motherhood |
| 47 | Take out 1 catcher | Enemy Elimination | Near The Motherhood | |
| The Data Scientist | 48 | Recover 2 carrot growing kits, peko! | Retrieval | Near The PizzaChief |
| 49 | Something good’ll happen if you build me a ladder, peko! | Structure | Near The Data Scientist | |
| The Mechanic | 50 | Build more jump ramps to keep my beloved car safe! | Structure | Near Savanna Mine |
| 51 | Recover the legendary streering wheel | Retrieval | BT Area Near The Ghost Hunter | |
| East Fort Knot (F4) | 52 | Recover 4 large-volume emergency kits | Retrieval | Near Mine North of F6 |
| 53 | Recover my necrobiote collection box | Retrieval | Near East Fort Knot (F4) | |
| The Chronobiologist | 54 | Get rid of the rodent-like chiral creatures | Enemy Elimination | Near The Metagenomicist |
| 55 | Recover 1 sample from the Hydrologist, sent by the Metagenomicist | Retrieval | Near The Metagenomicist | |
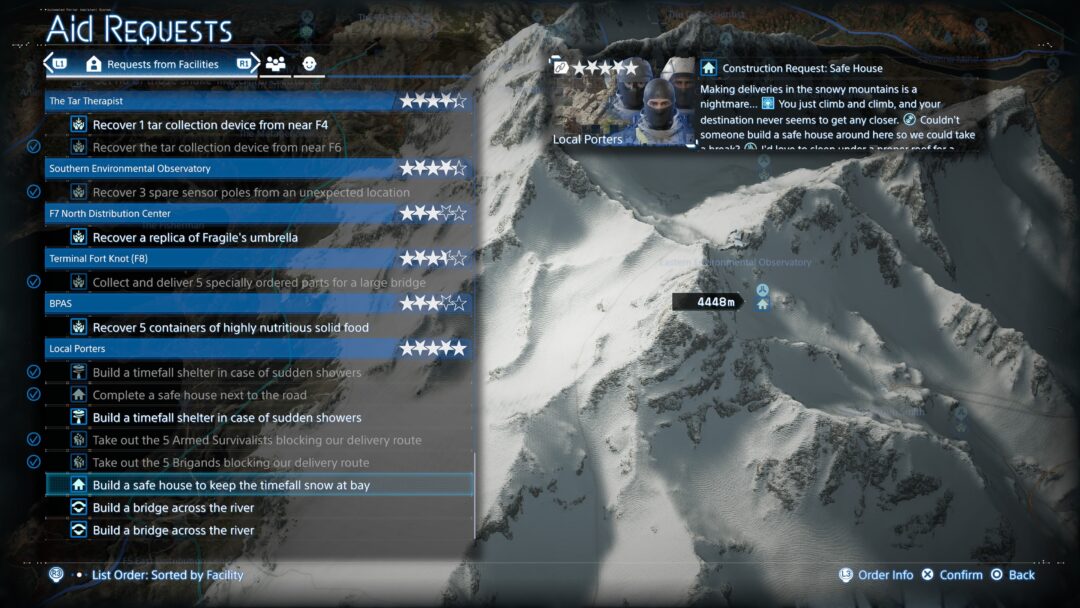
| The Metagenomicist | 56 | Build a safe house | Structure | Near The Metagenomicist |
| 57 | Get rid of the bat-like chiral creatures | Enemy Elimination | Near The Metagenomicist | |
| 58 | Recover my mother’s medical sample | Retrieval | BT Area Near Mine North of Tar Lake | |
| F5 East Distribution Center | 59 | Recover 1 precious work of art once again | Retrieval | BT Area Near F5 East Distribution Center |
| 60 | Recover an ultra-elaborate 1/2-scale Ludens figure | Retrieval | Near F5 East Distribution Center | |
| The Adventurer | 61 | Drive away the chiral creatures before my father finds them | Enemy Elimination | Near BPAS |
| Eastern Environmental Observatory | 62 | Recover 2 plate gate fragments | Retrieval | Near F5 East Distribution Center |
| 63 | Recover the seafood stew cooking kit | Retrieval | Near Eastern Environmental Observatory | |
| The Phantom Smith | 64 | Recover the tar velocimeter that my mentor developed | Retrieval | Near The Phantom Smith |
| 65 | Take out 5 watchers | Enemy Elimination | BT Area Near South Fort Knot(F6) | |
| The Aeronautical Engineer | 66 | Help your fellow porters by taking out 1 catcher | Enemy Elimination | BT Area Near The Aeronautical Engineer |
| 67 | Recover the Ver.8 Unmanned Reconnaissance Aircraft | Retrieval | Near The Aeronautical Engineer | |
| South Fort Knot(F6) | 68 | Get rid of those snake-like chiral creatures | Enemy Elimination | Near South Fort Knot(F6) |
| 69 | Recover 1 prototype unmanned tar exploration vessel | Retrieval | Near East Fort Knot (F4) | |
| The Tar Therapist | 70 | Recover 1 tar collection device from near F4 | Retrieval | Near East Fort Knot (F4) |
| 71 | Recover 1 tar collection device from near the Savanna Mine | Retrieval | Near the Savanna Mine | |
| 72 | Recover the tar collection device from near F6 | Retrieval | Near Mine North of F6 | |
| Southern Environmental Observatory | 73 | Recover 1 plate gate fragment | Retrieval | Near Southern Environmental Observatory |
| 74 | Recover 3 spare sensor poles from an unexpected location | Retrieval | Near Southern Environmental Observatory | |
| F7 Northern Distribution Center | 75 | Build a cargo catapult your fellowporters can use | Structure | Near F7 Northern Distribution Center |
| 76 | Recover a replica of Fragile’s umbrella | Retrieval | Near The Adventurer | |
| Terminal Fort Knot(F8) | 77 | Collect and deliver 5 specially ordered parts for a large bridge | Retrieval | Near Terminal Fort Knot(F8) |
| 78 | Recover 1 piece of tar magnetite | Retrieval | BT Area Near F5 East Distribution Center | |
| BPAS | 79 | Recover 1 stranded recorded media | Retrieval | Near South Edge Mine |
| 80 | Recover 5 containers of highly nutritious solid food | Retrieval | Enemy Camp Near F7 Northern Distribution Center | |
| Local Porters | 81 | Build a bridge across the river | Structure | Near Mine North of F1 |
| 82 | Take out the 5 Brigands blocking our delivery route | Enemy Elimination | Enemy Camp Near The Western Environmental Observatory | |
| 83 | Build a timefall shelter in case of sudden showers | Structure | Near The Inventor | |
| 84 | Build a bridge across the river | Structure | Near Savanna Mine | |
| 85 | Build a timefall shelter in case of sudden showers | Structure | Near South For Knot (F6) | |
| 86 | Take out the 5 Armed Survivalists blocking our delivery route | Enemy Elimination | Enemy Camp Near Heartman’s Lab | |
| 87 | Build a safe house to keep the timefall snow at bay | Structure | Near Eastern Environmental Observatory | |
| 88 | Complete a safe house next to the road | Structure | Near The DataScientist |
Afterword
I have completed all Aid Requests, but there were no special completion rewards. So, if you want to raise connection levels, it’s best to do these requests alongside your regular facility orders.
The little jokes and messages you get from SSS when completing Aid Requests are really entertaining, so if you have time, definitely try clearing some Aid Requests!


